Main Toolbar
Main Toolbar and Transport
![]()
The Main Toolbar in reMIDI 3 is your command center for managing and controlling your projects. Here's what you can do with each component:
Bypass MIDI Input
This feature provides a button that allows you to enable or disable the reception of note messages by the plugin. This gives you control over whether the plugin processes incoming MIDI data or ignores it.
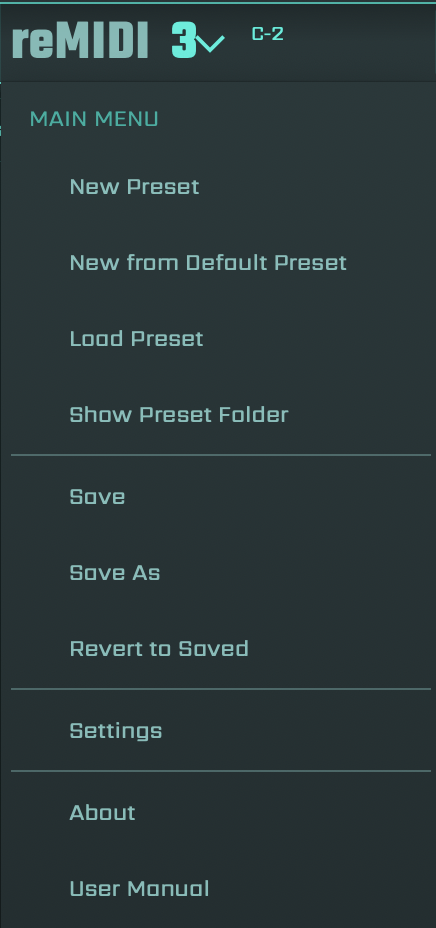
Main Menu Dropdown

New Preset
This option allows you to create a fresh, blank preset, serving as an empty canvas to build and customize your own MIDI sequences.
New from Default Preset
This selection offers the ability to create a new preset based on the default settings. This is useful when you want to begin with the basic configuration and introduce minor changes to it.
Load Preset
This function permits you to load a previously saved preset, useful for when you need to revisit or continue working on an earlier project or when you want to use a specific configuration as a starting point.
Show Preset Folder
This opens the folder where all your saved presets reside, providing quick access for preset management.
Save
This command conserves the current state of your work, capturing all modifications and changes, a crucial function to prevent loss of progress.
Save As
This allows you to save the current preset under a new name, perfect for when you want to create a variation of a preset without overwriting the original.
Revert to Saved
This discards all unsaved changes and reloads the most recent saved version of the current preset, a quick way to undo changes if you're unsatisfied with recent modifications.
Settings
This opens a menu with adjustable plugin settings to tailor the software to your needs.
About
This selection provides detailed information about the plugin, including its version number and the developer's contact information.
User Manual
This opens the user manual, offering detailed explanations about the plugin's functions and how to utilize them effectively.
MIDI Input Monitor
The MIDI Input Monitor is a display that shows the most recent MIDI note message received by the plugin. This feature can be extremely useful in verifying whether reMIDI 3 is correctly connected. It also serves as an informative tool during the MIDI mapping process of pads within the Grid section.
Undo/Redo Operations
These are a pair of buttons that allow you to reverse (undo) or reinstate (redo) specific actions performed within the plugin. Compatible operations include but are not limited to...
Preset Selection Dropdown
This dropdown menu displays all available presets for you to choose from.
Export Joined Clips
You can take advantage of the "Joined Clips" feature to compile all the pads in your project into a single MIDI file. To do so, locate and click on the "Joined Clips" icon—distinguished by four arrows—and then drag it. This allows you to place the combined pads into your digital audio workstation (DAW), a specific location on your computer, or even into a vacant reMIDI 3 pad in the Grid.
Export Separated Clips
The "Export Separated Clips" feature allows you to individually export all the pads in your project as separate MIDI files. This is particularly useful when you want to have more control over each pad during post-production.
To use this feature, simply locate and click on the "Export Separated Clips" icon. After doing this, you can select where to save each individual pad file. You can choose to export them directly into your Digital Audio Workstation (DAW), to a specific location on your computer, or into individual reMIDI 3 pads in the Grid.
Each exported pad stem will then become its own individual MIDI file, allowing for more precise manipulation and adjustment during your audio editing process.
Transport Controls
![]()
This is where you can play, stop, or skip forward/backward.
Play and Stop
Depending on the selection, the reMIDI 3's transport can control either the playback of the Previewer frame or the Editor's playhead.
Skip Backwark/Foreward
Similarly, reMIDI 3's transport can control either the position of the Previewer frame or the Editor's playhead, depending on the selection.
Now that we've explored the Main Toolbar, let's shift our attention to the next important component of the user interface: the Browser.
